Creating an FPGA project in Vivado (2025.1)
To ease the creation of new FPGA projects or adding new features to existing ones, Red Pitaya FPGA repository provides scripts and templates that automatically generate the existing projects.
Note
This section describes the current build flow for Vivado 2025.1 (OS 3.00+), based on the scripts in the RedPitaya-FPGA repository. The legacy Vivado 2020.1 method is still available for backward compatibility and is summarized in the Legacy Vivado 2020.1 compatibility section.
Download FPGA GitHub repository
First, we will transfer the FPGA GitHub repository to our local machine. Go to the FPGA GitHub repository and download the ZIP folder of this project.
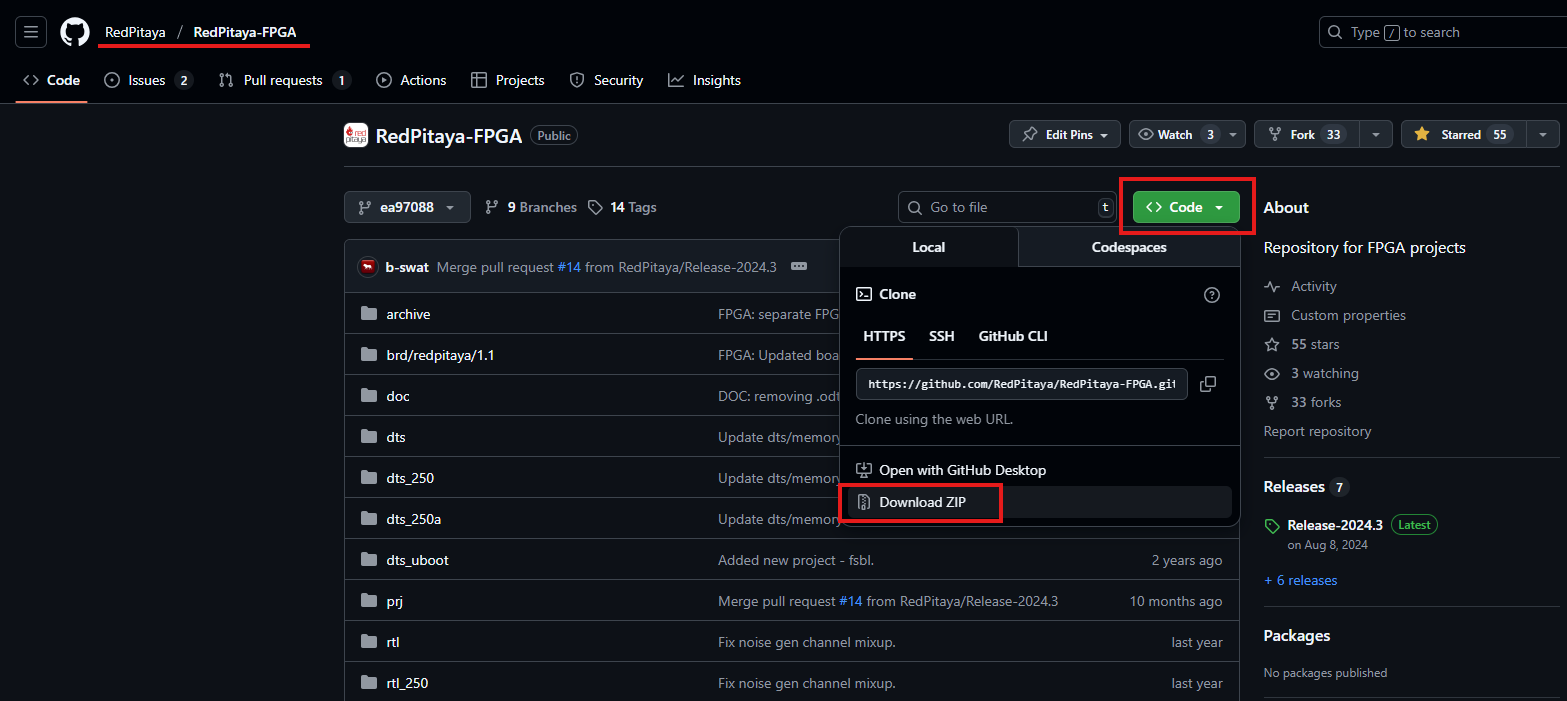
If you are using Windows, download and extract the project repository to a folder of your choice. Remember the location of the extracted repository.
As an alternative, if you are using Linux, first install Git, then navigate to the desired location and clone the Red Pitaya Git repository.
sudo apt-get install git
git clone https://github.com/RedPitaya/RedPitaya-FPGA.git
In either case, refrain from using spaces in the path to the extracted repository or the cloned repository.
Finally, rename the extracted repository folder to RedPitaya-FPGA.
Accessing older versions of the repository
The instructions above are meant for the latest version of the Red Pitaya FPGA, located in the master branch. If you are looking for an older version, please check the corresponding branch or tag in the GitHub repository.
Before OS 1.04-18, the FPGA repository was a part of the main Red Pitaya GitHub repository, and the FPGA projects were located in the fpga directory.
Build project options
When creating a new FPGA project, each user must consider the specific requirements and constraints of their target hardware platform. Each Red Pitaya board has its own specifications, which may require different configurations and optimizations in the FPGA design. To make things easier, the Red Pitaya FPGA repository provides a set of scripts and templates that can be used as a starting point for new projects. These templates include pre-configured settings and example designs that can be customized to meet the needs of individual projects.
The scripts automatically build the project depending on the selected flags. The following table shows which projects are available on which boards.
Build name |
Build Project Flag |
STEMlab 125-10
STEMlab 125-14
STEMlab 125-14-Z7020
|
SIGNALlab 250-12 |
SDRlab 122-16 |
STEMlab 125-14 4-Input |
STEMlab 125-14 Gen 2
STEMlab 125-14 PRO Gen 2
STEMlab 125-14 PRO Z7020 Gen 2
STEMlab 125-14 TI
STEMlab 65-16 TI
|
|---|---|---|---|---|---|---|
Active projects |
||||||
0.94 |
v0.94 |
X |
X |
X |
X |
|
0.94_250 |
v0.94_250 |
X |
||||
stream_app |
stream_app |
X |
X |
X |
X |
|
stream_app_250 |
stream_app_250 |
X |
||||
logic |
logic |
X |
X |
X |
||
logic_250 |
logic_250 |
X |
||||
barebones |
barebones |
X |
X |
X |
X |
X |
fsbl |
fsbl |
X |
X |
X |
X |
X |
Legacy projects |
||||||
tft |
tft |
X |
||||
axi4lite |
axi4lite |
X |
||||
classic |
classic |
X |
||||
mercury |
mercury |
X |
||||
Model |
Build Model flag |
|---|---|
STEMlab 125-14 PRO Gen 2
STEMlab 125-14 Gen 2
STEMlab 125-14
STEMlab 125-10
|
MODEL=Z10 |
STEMlab 125-14 Z7020 |
MODEL=Z20_14 |
SDRlab 122-16 |
MODEL=Z20 |
SIGNALlab 250-12 |
MODEL=Z20_250 |
STEMlab 125-14 4-Input |
MODEL=Z20_4 |
STEMlab 125-14 PRO Z7020 Gen 2 |
MODEL=Z20_G2 |
STEMlab 125-14 TI
STEMlab 65-16 TI
|
MODEL=Z20_ll |
Note
Each combination of build project and build model flags should be considered unique and compatible exclusively with the corresponding Red Pitaya board model. This means that a bitstream generated for one board may not work on another board, even if they share the same FPGA chip. For example, a bitstream generated for STEMlab 125-14 will not work on SDRlab 122-16, resulting in the following error upon upload.
sh: 1: echo: echo: I/O error
BIN FILE loading through FPGA manager failed
Building process
Note
Before proceeding, please check that the Vivado and Vitis installation instructions were followed correctly.
For the current RedPitaya-FPGA flow, the main entry points are:
open_vivado.sh(Linux/Unix-like shells)open_vivado.bat(native Windows CMD/PowerShell)Root
Makefiletargets (make project,make,make dts)
The automatic project generation scripts have two possible modes of operation:
Non-project mode: This mode generates a set of files that can be used to build the project without opening the Vivado GUI. It is useful for users who prefer to work with command-line tools or want to automate the build process.
Project mode: This mode generates a Vivado project that can be opened in the Vivado GUI for further editing and customization. It is useful for users who want to work with the graphical interface of Vivado and make changes to the design interactively.
Non-project mode
In non-project mode, the generated files are organized in a flat directory structure, making it easier to manage and version control the individual files. However, users lose the benefits of the Vivado project structure, such as the ability to easily open and edit the project in the Vivado GUI. Non-project mode uses RTL, constraints, and board configuration files to generate outputs without creating a full GUI project.
Note
The Red Pitaya FPGA repository must be downloaded through the git command, otherwise the project creation will fail.
The current repository contains these relevant script types:
TCL script |
Functionality |
|---|---|
|
Generates the bitstream and reports for a selected model. |
|
Generates FSBL executable binary (see SDK/Vitis project creation). |
|
Generates device tree sources (see SDK/Vitis project creation). |
|
Generates simulation files. |
Open terminal or shell.
Linux: use a regular terminal.
Windows native GUI flow: use CMD/PowerShell with
open_vivado.bat.Windows make-based flow: use a Unix-like shell (Git Bash, MSYS2, or WSL), as the Makefile uses Unix shell tools.
Note
For
make-based builds on Windows, install and expose these tools in your shell environment:make,gcc,dtc, andxsct.Navigate to the extracted FPGA repository. In this instance, we have renamed the extracted folder to RedPitaya-FPGA. If you have not renamed the folder, please use the original name.
cd "<path to Red Pitaya repository>/RedPitaya-FPGA"
Note
Contrary to Linux and Vivado, Windows uses backslashes (
\) instead of forward slashes (/) in file paths.Generate the project. Run the following command in the terminal or command prompt. Note the lack of the ``project`` keyword, which is used in the Project mode.
make PRJ=name MODEL=model
This is the standard non-project build command for RedPitaya-FPGA. You can also generate only the device tree with:
make dts PRJ=name MODEL=model
Bitstream location. The resulting bitstream .bit file is located in /prj/<project_name>/out/red_pitaya.bit.
Note
If an error occurs during the project generation, it is likely due to an incorrect Vivado version or missing dependencies. Please ensure that you have the correct version of Vivado installed and that all necessary dependencies are met. For more information on this issue, please refer to the Running the scripts in a different Vivado version section.
Project mode
The project mode generates a complete Vivado project structure, including all necessary files and directories. This allows users to open the project in the Vivado GUI and make changes as needed. Only the Red Pitaya FPGA repository is required to create a project in this mode. The project can be created using the following steps:
Open terminal or shell.
Linux/Unix-like shell:
./open_vivado.sh <project_name> <model>
Example:
./open_vivado.sh v0.94 Z20_250
Windows CMD/PowerShell (native):
open_vivado.bat <project_name> <model>
Example:
open_vivado.bat v0.94 Z20_250
Alternative (Linux or Unix-like shell on Windows):
make project PRJ=<project_name> MODEL=<model>
Navigate to the extracted FPGA repository. In this instance, we have renamed the extracted folder to RedPitaya-FPGA. If you have not renamed the folder, please use the original name.
cd "<path to Red Pitaya repository>/RedPitaya-FPGA"
Note
Contrary to Linux and Vivado, Windows uses backslashes (
\) instead of forward slashes (/) in file paths.Create or open the project. Use one of the commands above for your OS/shell.
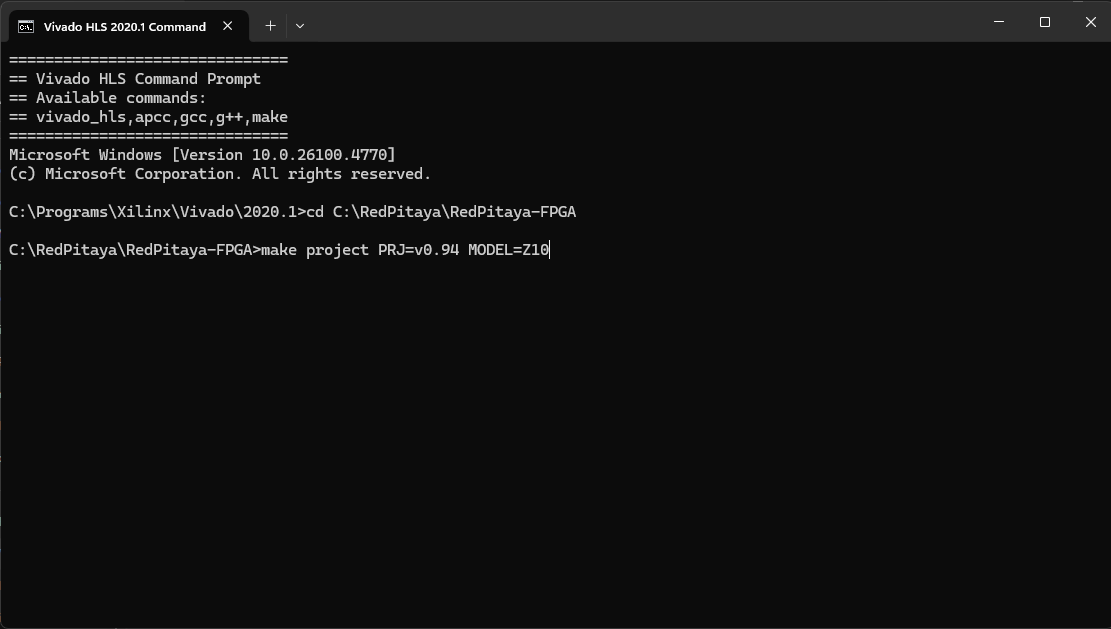
Here are reference pictures for the command-line options:
Terminal/CMD
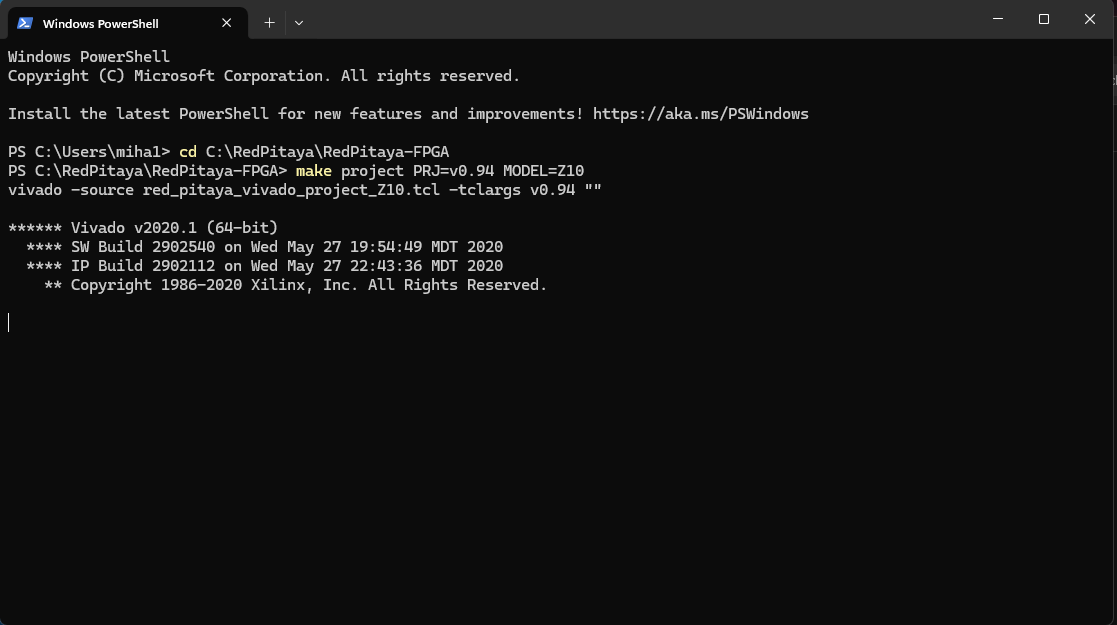
Vivado HLS Command Prompt
Vivado TCL Console

Modify the project. A project will be opened with all required Red Pitaya files. You can then add or write your Verilog module at the end of the red_pitaya_top.sv file, or add a new source by right-clicking the Design Sources folder and selecting Add Source. For more information on how to add sources and connect them in the design, please refer to the Modify project section.
Bitstream generation. You can now run the synthesis, implementation, and bitstream generation by clicking the corresponding buttons in the Vivado GUI. The resulting .bit file is located in prj/<project_name>/project/redpitaya.runs/impl_1/ as red_pitaya_top.bit (the name of the bitstream file matches the name of the top module of the design).
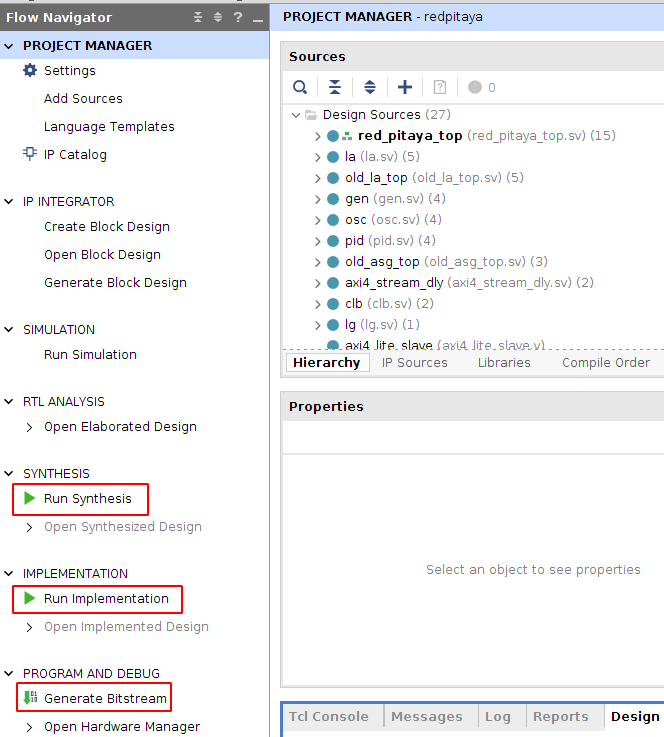
There are a few important things to note about the project creation process:
Reopen an existing project - Open Vivado and select the project from the Recent Projects list.

Recreating an existing project - Rerunning the make project command for the same
PRJcan overwrite generated project resources. Please back up important RTL resources and IP cores.
Creating a Safe Project Copy
Note
The information in this section is relevant for automatic project generation. For manual project creation, the process is much simpler and only requires copying the baseline project and modifying the RTL and constraints as needed. For more information, see Creating a Custom Project from Scratch.
A safe project copy is a duplicate of an existing project that can be modified without affecting the original project. This is useful when you may need to access the original project later or when you want to keep a backup of the custom design as rerunning the automatic project generation scripts can overwrite the custom design.
Why this matters:
rebuilding the same
PRJcan overwrite generated datakeeping a separate
prj/<new_project>folder makes backup and versioning easier
What does not need renaming:
the root launcher/model scripts such as
red_pitaya_vivado_Z10.tclorred_pitaya_vivado_Z20.tclopen_vivado.sh/open_vivado.batthe project-local filename
ip/system.tcl
These scripts are selected by MODEL and then use the folder name passed as PRJ to enter prj/<new_project>.
Recommended steps:
Create a new project folder under
prj/.Copy a baseline project (for example
prj/v0.94) into your new folder.Put your custom RTL in
prj/<new_project>/rtl.Keep testbenches in
prj/<new_project>/tbn.Build with explicit model flags.
Example:
cd RedPitaya-FPGA
cp -r prj/v0.94 prj/new_project
make project PRJ=new_project MODEL=Z10
make PRJ=new_project MODEL=Z10
Windows native project-open example:
open_vivado.bat new_project Z10
Additional checks after copying
Copying a project directory is usually enough for baseline projects such as v0.94.
However, it is not always sufficient for every project.
Repository check against current RedPitaya-FPGA master shows that some root model scripts contain project-name-specific logic, for example:
if {$prj_name == "stream_app"}if {$prj_name == "logic"}
These branches set project-specific global variables before sourcing the local block-design Tcl.
This means:
copying
v0.94to a new name is generally straightforwardcopying
stream_apporlogicto a new name may require additional script updates
Typical follow-up tasks for renamed project copies:
Check whether the copied project depends on
$prj_namematches inred_pitaya_vivado_<MODEL>.tcl.If it does, update those conditions for your new project name or refactor the project-specific settings into project-local Tcl.
Review local helper scripts under
tbn/and similar folders for hardcoded project paths or old names.
Note
In the current repository, the main build entry points use the copied folder name correctly. The extra work appears only when a project relies on exact project-name checks or contains helper scripts with hardcoded paths.
For manual file-selection details (constraints and config files) when creating projects beyond template copying, see Creating a Custom Project from Scratch.
Legacy Vivado 2020.1 compatibility
The current RedPitaya-FPGA master branch targets Vivado 2025.1. For older OS branches or archived projects that were created for Vivado 2020.1, keep using the legacy flow.
Current branch (OS 3.00+): Vivado 2025.1
Legacy flow (OS 1.04 - 2.00): Vivado 2020.1 + SDK 2019.1
For legacy tool installation and usage, see Vivado 2020.1 installation and SDK 2019.1 legacy installation.
Windows and Linux notes for legacy flow
Linux: run commands in a regular shell with Vivado 2020.1 environment loaded.
Windows with Unix-like shell (Git Bash/MSYS2/WSL):
makeflow works as above.Windows CMD/PowerShell without make: run Vivado directly with legacy Tcl entry points:
C:\Xilinx\Vivado\2020.1\bin\vivado.bat -source red_pitaya_vivado_project_Z10.tcl -tclargs v0.94
C:\Xilinx\Vivado\2020.1\bin\vivado.bat -source red_pitaya_vivado_Z10.tcl -tclargs v0.94
Running the scripts in a different Vivado version
Running the auto-project generation scripts in a different Vivado version than the one they were generated for may result in errors. This is because the scripts are tailored to specific Vivado versions and may not be compatible with others. If possible, please install the Vivado version that the scripts were generated for. If you cannot do this, you can try to modify the scripts to make them compatible with your Vivado version. Please note that this is not guaranteed to work and may require additional modifications to the scripts.
Vivado version (current scripts): 2025.1
Both Project mode and Non-project mode scripts are designed for a specific Vivado version and can fail when run in a different one.
... This script was generated using Vivado <2025.1> and is being run in <other_version> ...
First, find the Vivado version line in the script. It should look like this:
set scripts_vivado_version 2025.1Change the script version only if necessary. This is a quick workaround to get a build moving in another Vivado version. However, this solution could cause problems if some of the IPs used are different in your version.
To update the script properly, open the project in Project mode and select Reports > Report IP Status from the menu. A new tab will open below the code window. If not all IPs are up to date, they need to be updated. Before doing this, however, you must manually modify the TCL script to match your Vivado version; otherwise, the block design will not be created when Vivado starts.
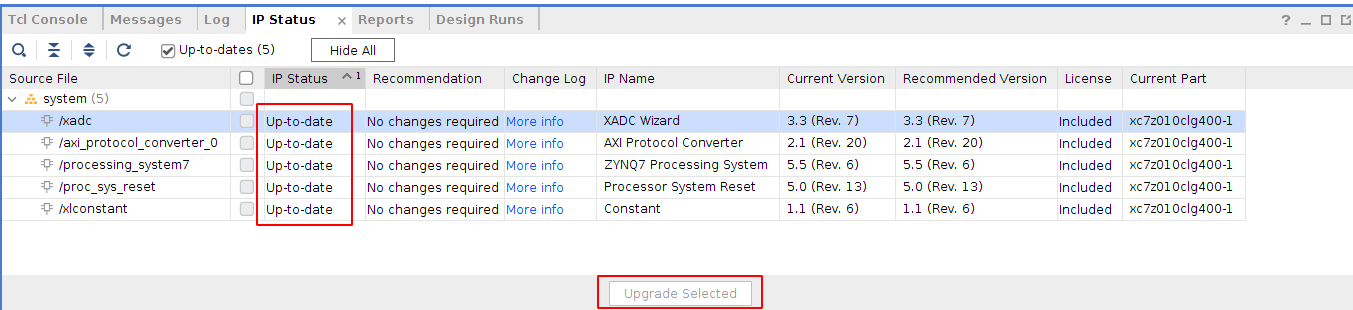
Update the script. Once the IPs are up to date, go to the Tcl console tab and run the following command.
write_bd_tcl systemZ10.tclThis generates a new tcl script that replaces the old script in the
prj/<project name>/ipdirectory.Note
Depending on the board model you are using, the script name may differ. Please check the Build project options to identify the correct script name from the project flags.