Step 2: Status LEDs
In this section we will check the status LEDs on the Red Pitaya board to determine if there are any hardware issues. The status LEDs provide valuable information about the state of the board and can help identify potential problems.
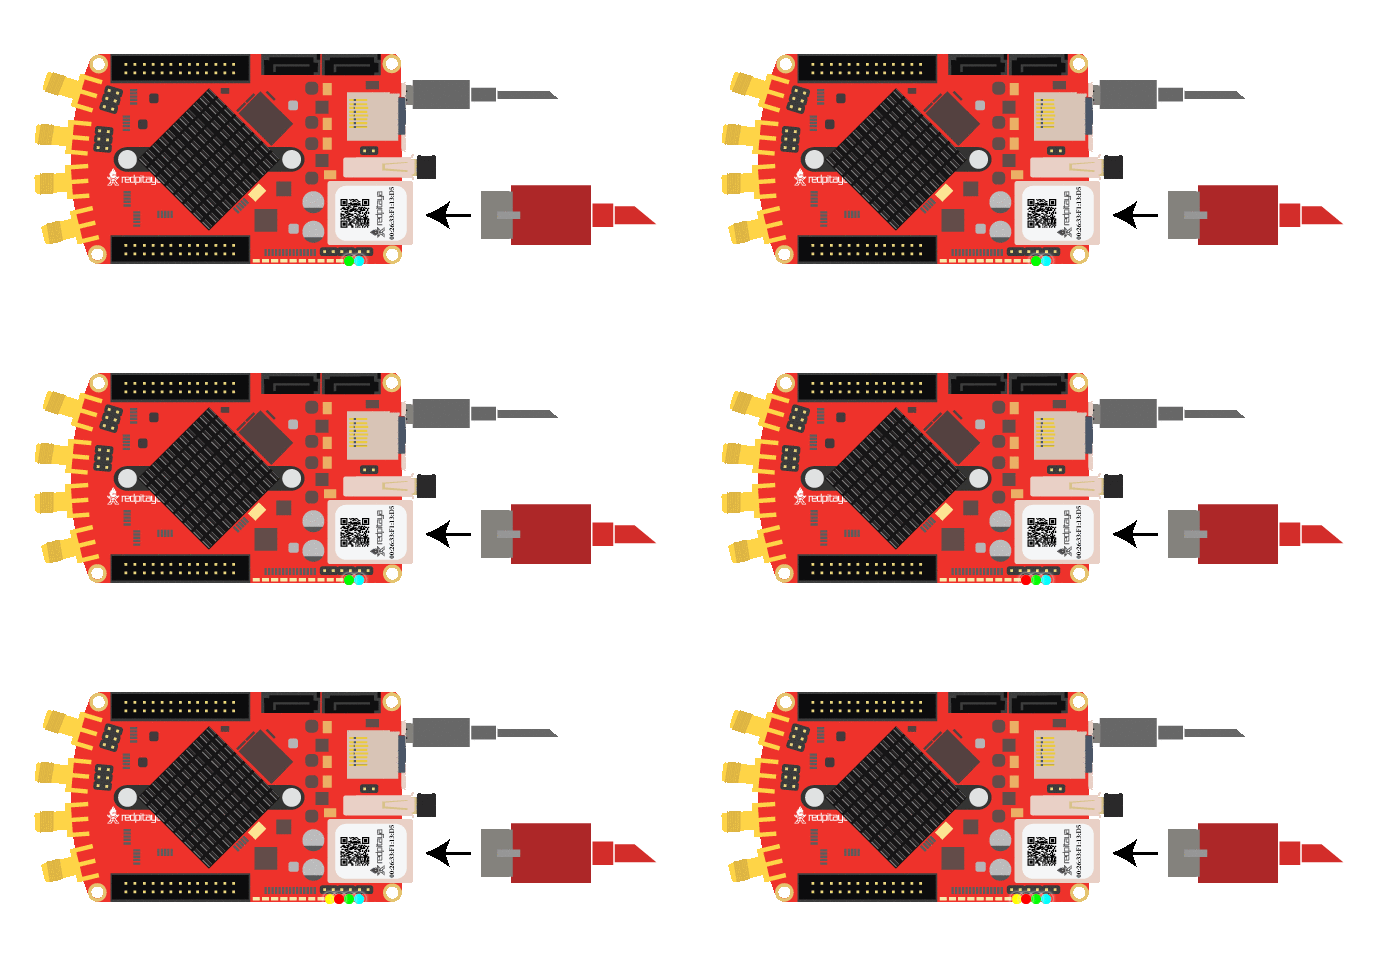
Red Pitaya Status LED Description:
Green LED - Power good.
Blue LED - FPGA image loaded and OS booted.
Red LED - CPU heartbeat.
Orange LED - SD card access.
Step-by-step LED check
Follow the steps below and stop when your board matches one of the LED patterns.
1. Check the Green LED first
The Green LED is the most important one of all the status LEDs, as it indicates whether the Red Pitaya board is receiving power properly.
If the Green LED is OFF or blinking, this points to a power issue.
Power supply functionality - Confirm the power supply is plugged into the
PWRUSB port.Cable issue - Reseat the cable (unplug and plug it in again), or try a different cable.
Verify power delivery:
Gen 2 boards require 5V / 3A
Original Gen boards require 5V / 2A
SIGNALlab 250-12 requires 24V / 0.5A
Computer USB ports typically provide only 0.5A, which is not enough.
Issue remains - If the issue remains, this indicates a hardware problem with the power supply. Please contact us.
2. Green ON, Blue OFF, Orange barely lit or OFF
This usually indicates a problem loading the Red Pitaya file system from the SD card.
Power supply functionality - Confirm the power supply is plugged into the
PWRUSB port.Micro SD card - Confirm the micro SD card is inserted.
Red Pitaya OS - Confirm that Red Pitaya OS is installed on the SD card.
If needed, reinstall the Red Pitaya OS on the SD card.
SD cards that ship with Red Pitaya should already include the official OS, but occasionally they may be empty or outdated.
3rd-party OS - If you are using a 3rd-party OS (for example Pavel Demin’s Alpine Linux), this can be normal behavior.
In some 3rd-party images, status LEDs are normally off.
Check the Pavel Demin’s Red Pitaya Notes or the relevant 3rd-party documentation.
EEPROM reading issue - Check for an incorrect
hw_revvalue or EEPROM reading issue.OS versions 2.00 and higher require a correct
hw_revin EEPROM.If the issue started after an OS update, verify
hw_revusing GitHub issue #250.The RMA terms in that issue apply regardless of warranty status.
SD card corruption - Check for SD card corruption.
Test the SD card in another Red Pitaya board, or
Replace the SD card and install a fresh OS image.
Inspect SD card holder - Check for bent pins in the SD card holder. If any are bent upwards and are not in contact with the pins of the SD card, remove the SD card and push them into the normal position with a toothpick or similar tool.
Issue remains - If still unresolved, this likely indicates a hardware problem. Skip straight to Step 4: Serial console boot log and inspect boot messages for SD or file-system errors.
3. Green and Blue ON, Red and Orange cycle repeatedly
Pattern:
Green and Blue LEDs turn ON.
Red and Orange LEDs flash briefly.
Red and Orange LEDs then either stay ON or turn OFF both for about 2 seconds.
The same cycle repeats.
This indicates a reboot loop.
Verify external clock connection - If you have an External Clock version of a Red Pitaya board, verify that the external clock is connected to E2.
Verify external clock speed - Verify the input clock matches recommended clock specifications.
Issue remains - If the clock connection/specification is correct and the reboot loop continues, please contact us.
Using a normal board? - If you are using a normal Red Pitaya board (not an External Clock version), this may indicate a hardware problem. Please contact us.
Note
With OS 3.00 and higher, the external clock Red Pitaya boards will boot even without an external clock connected. However, the board will not operate properly without a clock.
4. Green ON, Blue OFF, Red heartbeat, Orange activity during boot
Pattern:
Green LED is ON.
Blue LED is OFF.
Red LED flashes in a heartbeat pattern.
Orange LED flashes sporadically during boot and usually turns OFF after about 1 minute.
This behaviour is quite close to the normal boot pattern, but the Blue LED should be ON after boot.
Damaged blue LED - Check that the Blue LED is not damaged. If the board is under warranty, we will replace it.
5. Green and Blue ON, Red heartbeat, Orange activity during boot
Pattern:
Green and Blue LEDs are ON.
Red LED flashes in a heartbeat pattern.
Orange LED flashes sporadically during boot and usually turns OFF after about 1 minute.
This is normal behavior and indicates the board is booting properly and the hardware is functioning correctly.
Next steps
If you have completed the LED check and the issue persists, please proceed to the next troubleshooting step:
Cannot connect to the web interface? Follow Step 3: Network connection. Or click Next in the bottom right corner of this page (both lead to the same page).
Issue with web interface or signals? Follow Step 5: Hardware connections.