Generate continuous signal
Description
This example shows how to program Red Pitaya to generate an analog 2 kHz sine wave signal with a 1 V amplitude. Voltage and frequency ranges depend on the Red Pitaya model.
Required hardware
Red Pitaya device
Required software
2.00-23 or higher OS
Note
This code is written for 2.00-23 or higher OS. For older OS versions, please check when specific commands were released (a note is added to each command introduced in 2.00 or higher verisons).
SCPI Code Examples
Code - MATLAB®
The code is written in MATLAB. TCP client communication is used to establish socket communication with Red Pitaya, then SCPI commands are sent to configure the various Red Pitaya peripherals. Copy the code below into the MATLAB editor, save the project and press the Run button. Tested on MATLAB 2024b.
%% Define Red Pitaya as TCP/IP object
IP = 'rp-f0a235.local';           % Input IP of your Red Pitaya...
port = 5000;
RP = tcpclient(IP, port);

%% Open connection with your Red Pitaya
RP.ByteOrder = 'big-endian';
configureTerminator(RP, 'CR/LF');

waveform = 'sine';
freq = 20000;
ampl = 0.4;

writeline(RP,'GEN:RST');

writeline(RP, append('SOUR1:FUNC ', waveform));             % Set function of output signal % {sine, square, triangle, sawu,sawd, pwm}
writeline(RP, append('SOUR1:FREQ:FIX ', num2str(freq)));    % Set frequency of output signal
writeline(RP, append('SOUR1:VOLT ', num2str(ampl)));        % Set amplitude of output signal

writeline(RP,'SOUR1:TRig:SOUR INT');
writeline(RP,'OUTPUT1:STATE ON');               % Set output to ON

writeline(RP,'SOUR1:TRig:INT');                 % Generate trigger

%% Close connection with Red Pitaya
clear RP;
Code - Python
Using SCPI commands:
#!/usr/bin/env python3

import sys
import redpitaya_scpi as scpi

IP = "192.168.178.111"
rp = scpi.scpi(IP)

wave_form = 'sine'
freq = 2000
ampl = 1

rp.tx_txt('GEN:RST')

rp.tx_txt('SOUR1:FUNC ' + str(wave_form).upper())
rp.tx_txt('SOUR1:FREQ:FIX ' + str(freq))
rp.tx_txt('SOUR1:VOLT ' + str(ampl))

# Enable output
rp.tx_txt('OUTPUT1:STATE ON')
rp.tx_txt('SOUR1:TRig:INT')

rp.close()
Using functions:
#!/usr/bin/env python3

import sys
import redpitaya_scpi as scpi

wave_form = 'sine'
freq = 2000
ampl = 1

IP = "192.168.178.111"
rp = scpi.scpi(IP)

rp.tx_txt('GEN:RST')

# Function for configuring a Source
rp.sour_set(1, wave_form, ampl, freq)

# Enable output
rp.tx_txt('OUTPUT1:STATE ON')
rp.tx_txt('SOUR1:TRig:INT')

rp.close()
Note
The Python functions are accessible with the latest version of the redpitaya_scpi.py document available on our GitHub. The functions represent a quality-of-life improvement as they combine the SCPI commands in an optimal order and also check for improper user inputs. The code should function at approximately the same speed without them.
For further information on functions please consult the redpitaya_scpi.py code.
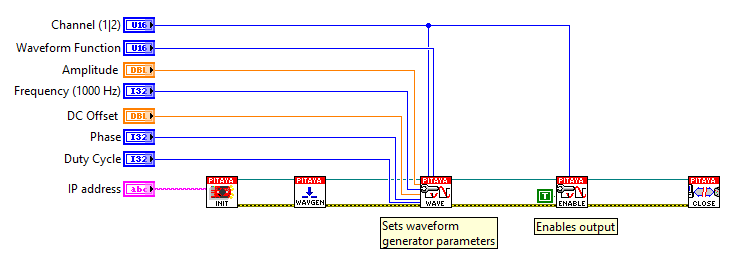
Code - LabVIEW
API Code Examples
Note
The API code examples don’t require the use of the SCPI server. Instead, the code should be compiled and executed on the Red Pitaya itself (inside Linux OS). Instructions on how to compile the code and other useful information are here.
Code - C++ API
/* Red Pitaya C++ API example of Continuous generation on a specific channel */

#include <stdio.h>
#include <stdint.h>
#include <stdlib.h>
#include <unistd.h>

#include "rp.h"

int main(int argc, char **argv){

    /* Print error, if rp_Init() function failed */
    if(rp_Init() != RP_OK){
        fprintf(stderr, "Rp api init failed!\n");
    }

    /* Reset generator */
    rp_GenReset();

    /* Generation */
    rp_GenWaveform(RP_CH_1, RP_WAVEFORM_SINE);    // Waveform
    rp_GenFreq(RP_CH_1, 2000.0);                  // Frequency
    rp_GenAmp(RP_CH_1, 1.0);                      // Amplitude

    // Emable channel output
    rp_GenOutEnable(RP_CH_1);

    // Trigger generation
    rp_GenTriggerOnly(RP_CH_1);

    /* Releasing resources */
    rp_Release();

    return 0;
}
Code - Python API
#!/usr/bin/python3

import time
import rp

#? Possible waveforms:
#?   RP_WAVEFORM_SINE, RP_WAVEFORM_SQUARE, RP_WAVEFORM_TRIANGLE, RP_WAVEFORM_RAMP_UP,
#?   RP_WAVEFORM_RAMP_DOWN, RP_WAVEFORM_DC, RP_WAVEFORM_PWM, RP_WAVEFORM_ARBITRARY,
#?   RP_WAVEFORM_DC_NEG, RP_WAVEFORM_SWEEP

channel = rp.RP_CH_1        # rp.RP_CH_2
waveform = rp.RP_WAVEFORM_SINE
freq = 2000
ampl = 1

# Initialize the interface
rp.rp_Init()

# Reset generator
rp.rp_GenReset()

###### Generation #####
rp.rp_GenWaveform(channel, waveform)
rp.rp_GenFreqDirect(channel, freq)
rp.rp_GenAmp(channel, ampl)

# Enable output and trigger the generator
rp.rp_GenOutEnable(channel)
rp.rp_GenTriggerOnly(channel)

# Release resources
rp.rp_Release()